
The first website you create with HTML won’t be the prettiest or the most functional. Still, you have to start somewhere, and a project like this is a great opportunity to pick up some basic skills or make your IT task easier to complete.
Creating an HTML Project
Let’s create a project from scratch — I’ll show you step by step how to make a simple HTML website. I encourage you to study this design from cover to cover, then rework it yourself. With hands-on practice and by refining it or adding more modules that work in a similar way, it’ll be much easier to really learn something.
Here’s what we’ll do:
- we’ll create a website entirely from scratch, without using HTML or CSS frameworks or libraries such as Bootstrap,
- it’ll look fairly clean, but also transparent. I don’t want to use too many colors and images,
- I’ll also show you some CSS basics that will help you improve your website’s visual layer at least a little,
- I want to keep things simple, so we won’t get into more complex topics. We won’t work in just one file from the very beginning. That could be done, but it’s not a very good choice in the long run, so it’s worth avoiding it from the start.
Step 1. Create a folder for the files
At the very beginning, it would be a good idea to get your folder structure in order. Files in different directories can cause problems when finding paths to link to. I don’t want to make things difficult for you, so try to put all the files discussed here in one folder.
We’ll create files such as:
- index.html
- obomne.html
- style.css
Step 2. Open index.html with Notepad or any code editor
A code editor isn’t required to create web pages. In fact, you can even do it in Windows Notepad — that’s how I started myself. But the truth is, hardly any experienced coders do it that way — it’s a waste of nerves and time. If you’re serious about learning to create web pages, I suggest downloading a free code editor, such as Visual Studio Code.
Step 3. Create a simple page skeleton in index.html
The index.html file
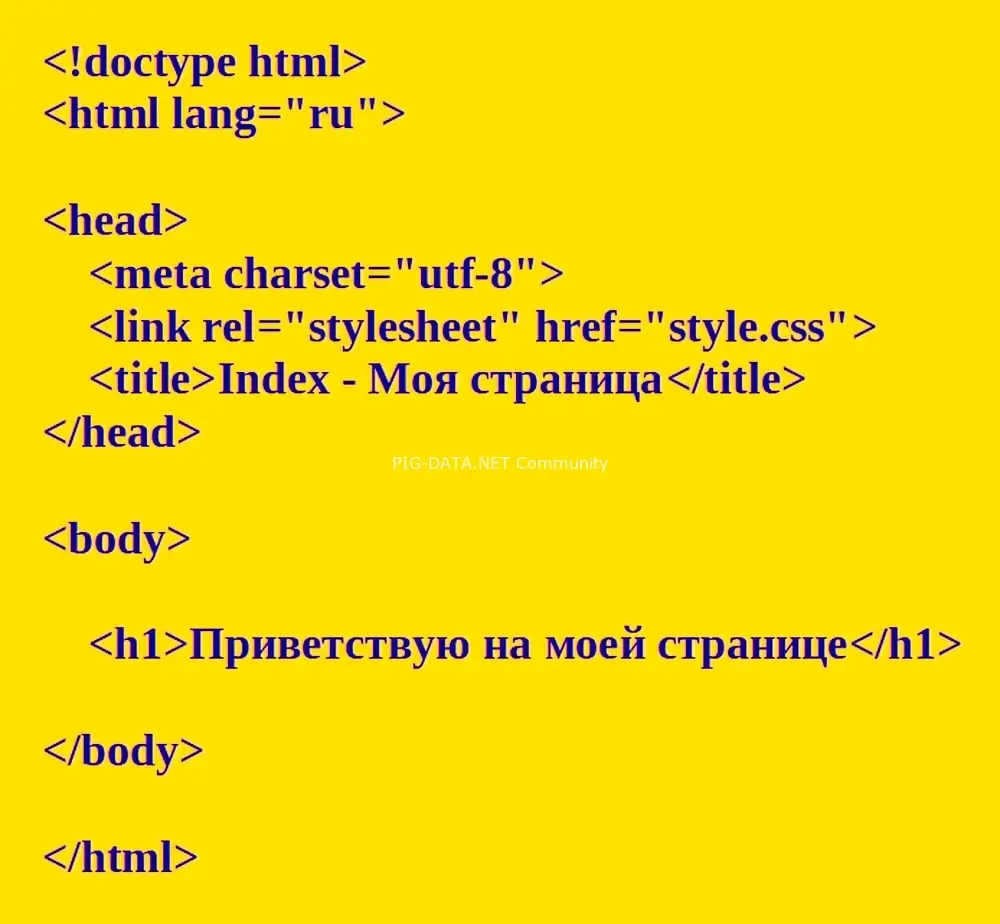
Let’s start by defining the document type and the language of your website in the <html> tag. Below that is the head, or “header” of your website, where you can set the character encoding (for Russian, I recommend utf-8), attach additional CSS stylesheets (you’ll need them to make your website look more interesting), or, for example, add a title tag that lets you set the title shown on the browser tab.
Step 4. Add a header, a menu, some content, and a footer
The index.html file
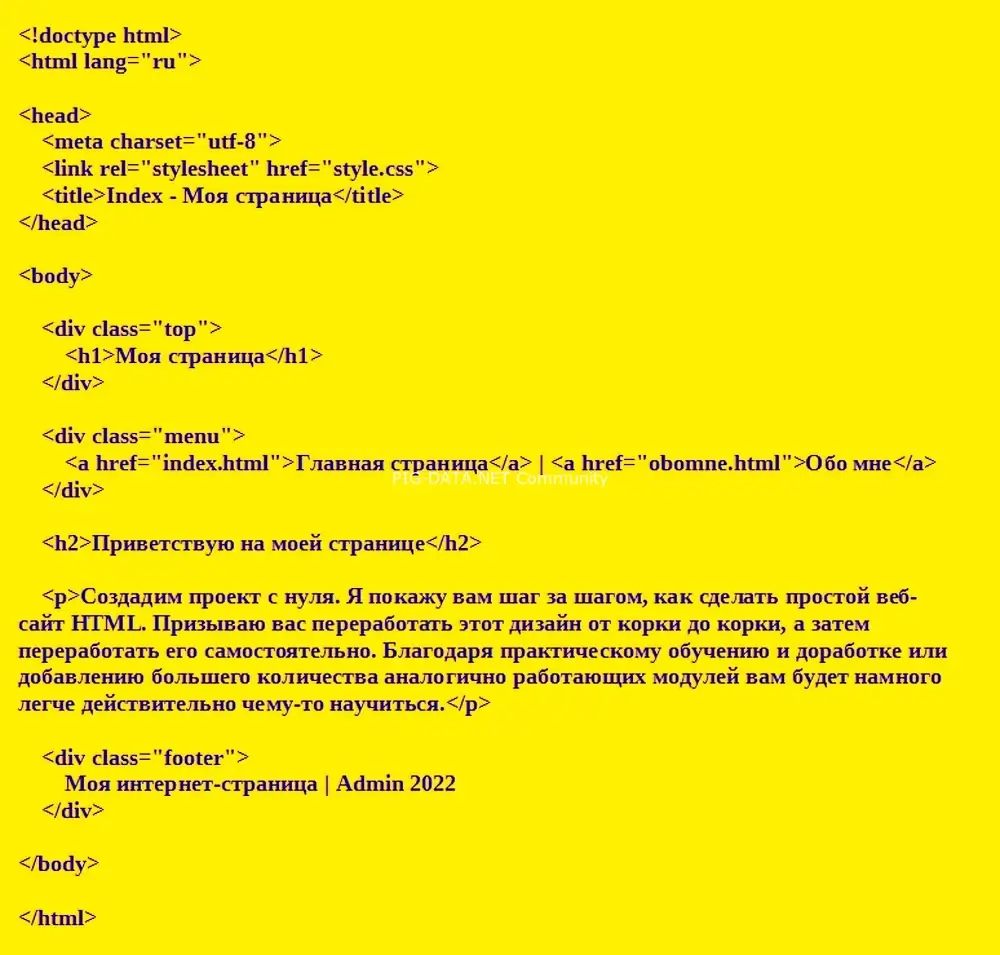
You add elements to the body section of your document. They’ll work even without the intermediate <div> and </div> tags, but I didn’t put them there by accident. Thanks to them and the class names you assign (the class attribute), you’ll be able to refer to these elements in CSS, where you can give them some properties to improve the visual aspects of your website.
In the menu div, we also used <a> tags. With the href attribute, you can redirect the user to any other page after they click, including a subpage of your website. These tags let you make it easy for users to navigate your site.
Step 5. Add some CSS
The style.css file
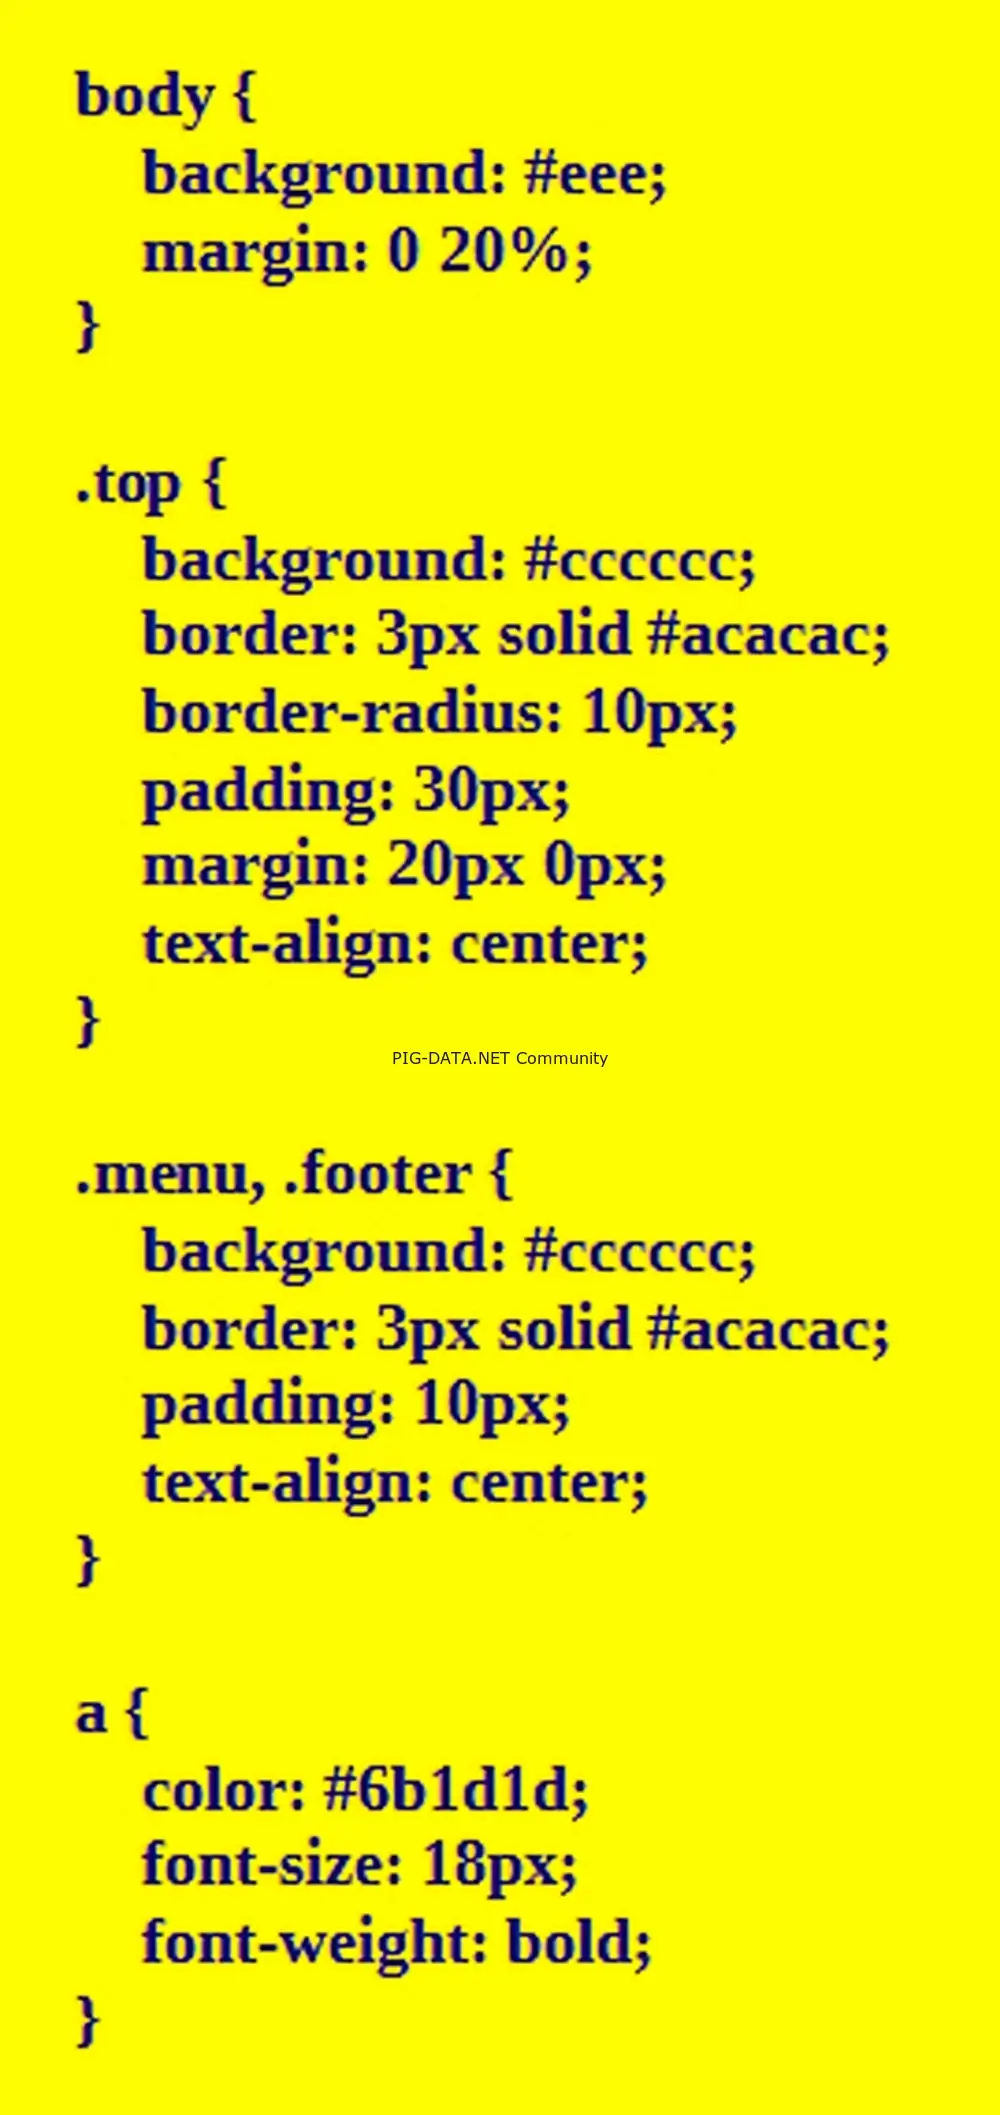
We refer to the entire body by its name, “body,” and to classes by their individual names, preceded by a period. I gave the “menu” and “footer” classes the same properties, so I didn’t split them into two sets of curly braces; I put them after a comma instead. I didn’t give the <a> elements in our HTML file any special classes or IDs (id), so I refer directly to the tag itself. However, remember that in this case every link on your website will be styled this way.
Between the curly braces, I set individual properties such as:
- background — sets the background of an element (or the entire page in the case of body). You can specify it using, for example, RGB or HEX colors,
- margin — the distance from the edge. It let me easily make the page a little narrower so it wouldn’t be so wide,
- border — the element’s border; I set its width to 3 pixels, with a solid style and a gray HEX color,
- border-radius — rounds the border,
- padding — spacing that, unlike margin, is inside rather than outside the element,
- text-align: center — let me center the lines in the header, menu, and footer,
- color — sets the text color,
- font-size — the font size,
- font-weight — the font weight.
I recommend playing around with these values and removing some, changing them, or adding something else. It’s a very good way to learn by doing.
Step 6. Create an “About Me” page
File: obomne.html
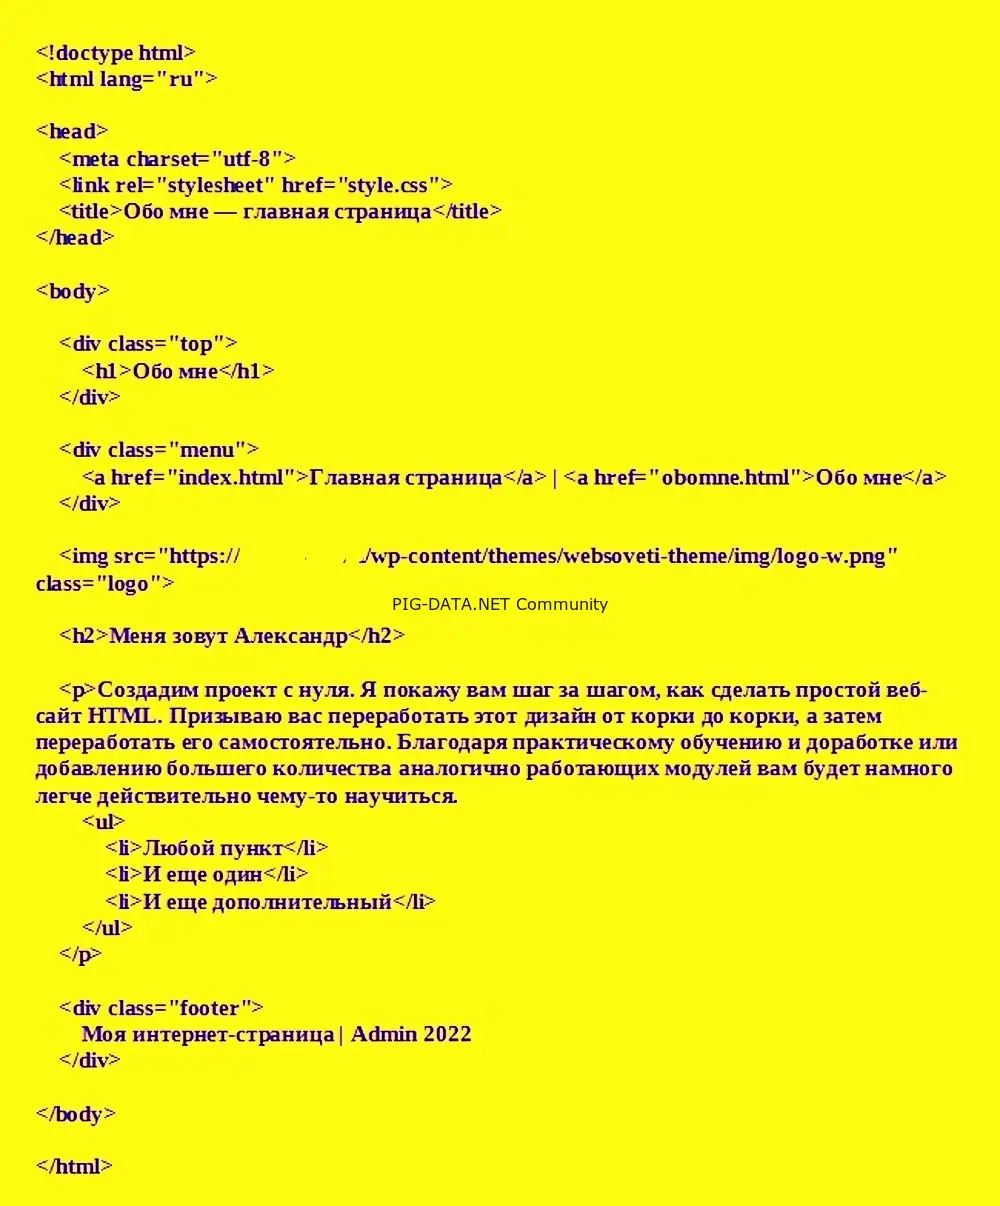
In fact, we’re copying the previous file and changing the title value and the page heading (h1). The content has also been changed: I added a bulleted list (the <li> elements, enclosed in the <ul> tag) and the websoveti.ru logo. In addition to the file path, I also added the logo class to the “src” attribute. This class has a specific margin value, so add the following code to the CSS stylesheet:
- the file’s logo class: style.css (after attaching it, the image will look a little different, as in the screenshot below)

To view the HTML page, simply open the index.html file in any browser. If you want to publish it online, you’ll need to use some kind of server or hosting service. Any free web hosting service will do for simple HTML pages intended for learning purposes.
In this lesson, I showed you how to create a very simple website based only on basic HTML and CSS features. If you’re new to this project, you can build on it and get a little practice. Later, I also recommend learning, for example, the basics of PHP, which will let you save the menu code in a separate file. That way, if you wanted to add a new item, you wouldn’t have to change it manually in the menu on every subpage (which is a bit inconvenient, especially when you have more than two or three subpages). Alternatively, you can learn right away to create templates for ready-made CMSs such as WordPress.